We may earn money or products from the companies mentioned in this post.
As a blogger, your main focus is on your writing. Regularly creating and sharing well-written and thoughtfully-crafted is your sole priority. But it’s not all about the content — it’s also about the way your content is presented, and that includes your featured image.
To help you get the most from your blog, we’ve highlighted some tips and advice that the most successful bloggers follow. By the end, your hero image will really be living up to its name!It can be tempting to just grab a generic stock photo and leave it at that. But choosing a high-quality featured image can actually increase your blog traffic and social shares. So while your content is crucial, you might be selling yourself short with a lacklustre hero image.

What else should you do before and after publishing a blog post? Aside from choosing a featured image before finalizing everything, you should take note of these other actions!
Include your header in your image
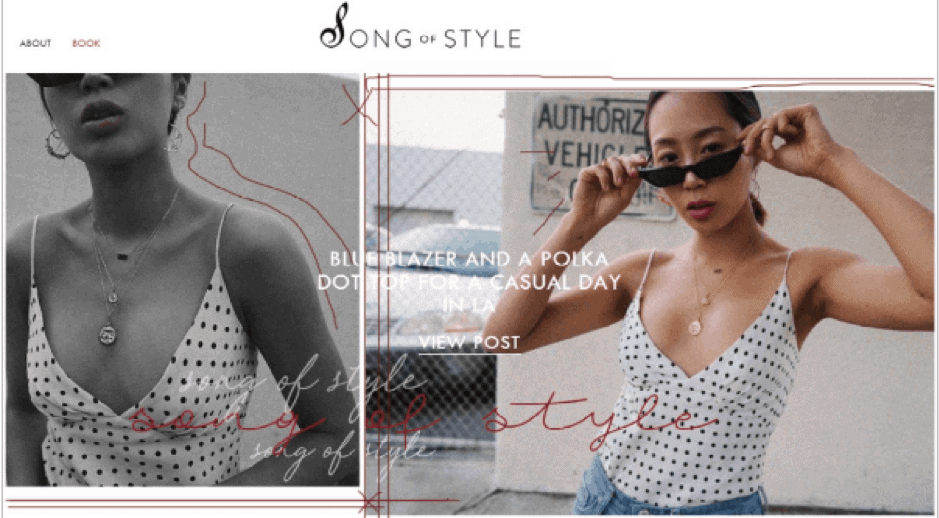
Including a catchy blog title in your featured image is a great way to make your post stand out when you share it across social media. It’s a common technique you’ll see in a range of blogs from around the web, and it’s simple but effective. By consolidating the content of your blog post with a featured image that represents it in some way, you create a standalone image that grabs the viewer’s attention.
Check out the below example from fashion blog Song of Style:
The image is striking, the model coolly appraising the viewer from behind her dark shades. On top of that, the black-and-white photo contrasts with the color image to really grab the viewer’s attention. Their gaze is drawn to the text overlay over the image, creating an image that compels the reader to read on.
Add a quote for an eye-catching hero image
In the same vein, a text overlay doesn’t always need to be your post title. Simply including a quote from your piece is enough to create a featured image that works. The key to it is to find the most intriguing, click-worthy quote in your post. It could be a controversial statement, something tongue-in-cheek, or just a bizarre comment that will make your readers want to find out more.
There is a range of free tools online that let you quickly and easily add text to images. Canva in particular is an easy-to-use site that gives inexperienced users a trouble-free way to edit and manipulate images. With a little practice, you’ll find you can edit images with ease.
Get the perfect size for social media
Another aspect of your featured image that might well have slipped your mind is its size — or, to be more specific, its shape. While there is lots of advice on best practice for the perfect featured image size, it ultimately doesn’t matter. What does matter is how wide and tall it is.
Most social media platforms resize photos automatically when they’re shared online. To avoid having your image cropped, you should keep your images approximately twice as wide as they are tall. If its height is more than its width, it will be automatically cropped in tweets and posts.
Stick to landscape featured images for your blog posts and they won’t lose their quality when you start your social sharing. As a general rule of thumb, your image should be as wide as your content, that is between 600-650 pixels wide.
Faces in featured photos catch your attention
Including a face in your featured image might not seem like something that would affect your post’s engagement, but it actually plays a huge role in your marketing. Photos on Instagram showing faces receive 30% more likes than those without, a statistic that is just the tip of the iceberg when it comes to our natural fixation with faces. Humans are hardwired to seek out and find faces, even in manmade objects.
By including a face in your featured image, it will speak to your reader’s primal instinct to find a face, grabbing their attention as they scroll through their social feed. While it might not work for every piece of content you produce (a blog post about dogs with a human in the featured image wouldn’t make sense!), it can be employed successfully for most pieces.
There are a few things you should consider though. Some brands prefer not to use photos in which the subject is looking directly at the camera, believing that it feels unnatural. At the same time, there are other brands who don’t include eyes at, instead cropping faces off around the nose. Ultimately, it comes down to your own personal preference. Think about what feels right not just for you, but your audience as well.
Always use high-resolution images
This is an obvious one but one that many bloggers still fall down at. There’s no excuse for low-resolution or poor quality images in 2018! A low-res photo just makes your blog look bad, so be sure to stick to only the best for your posts.
But it’s not just aesthetics that come into play when you choose a high-resolution image. Your featured image will be used across social media as well, so it’s important that you find one that that looks good in different sizes. The thumbnail should look just as perfect as it does on the post, so it’s worth getting right.
Get access to “Checklist: Pro Tips for Best Blog Images” by joining our Free Resource Library, just CLICK BELOW!
Split test your header images
You might already be aware of brands A/B testing their adverts. In a nutshell, it’s simply testing two or more versions of an advert to see which one performs better with customers. A/B testing (also known as split testing) is an effective means of determining what components play best with audiences, letting brands tweak their marketing to get the most out of it.
But it’s not just adverts that can be split tested: featured images can also benefit from the process. By experimenting with different featured images, you can make sure you choose the most attractive and engaging one for your blog post.
There are lots of image optimizer widgets available that make it easy for you to split test your images. Simply install the plugin to your blog, create and share a post, and it will automatically show one of two images to your readers. The one that generates the most click-throughs to your post will then be selected as the permanent featured image.
Be consistent with each image
When it comes to your blog, consistency is everything. Creating a coherent and recognizable style is hugely important for building your brand, and it applies to everything, from your color scheme to your font. And it’s just as important when it comes to choosing your featured image too.
But how can you stay consistent without using the same image every time? The snapshot below from HubSpot is a great example of how to get it right:
While the two images aren’t the same, they do speak the same visual language as each other. Light colors and similar content such as laptops and desks create a visual synchronicity that ties the content together, while keeping them distinct.
It’s important that your featured images also remain visually consistent. In the same way that your writing style stays the same throughout, so too should your imagery. Set standards for your posts and stick to them, and your posts will look and feel more connected as a result.
Avoid visually cluttered images
When you’re selecting a featured image for your blog, it’s important to choose one that is simple and uncluttered. An image that is loud, busy, or has a lot going on will just distract your readers from your actual content, and that’s the last thing you want.
Instead, choose one that catches your reader’s attention, but doesn’t hold it. It needs to be enough to persuade them to read your post by quickly conveying what it’s about. Take the example from Nomadic Matt’s travel blog below:
It’s a stunning image of the Azerbaijani countryside that’s pleasing to the eye and enough to grab your attention. But it’s an unbusy image with little actually happening in it. It serves its purpose perfectly though: the reader sees the gorgeous photo, then is drawn to the title to read on.
Use mockups for a personalized image
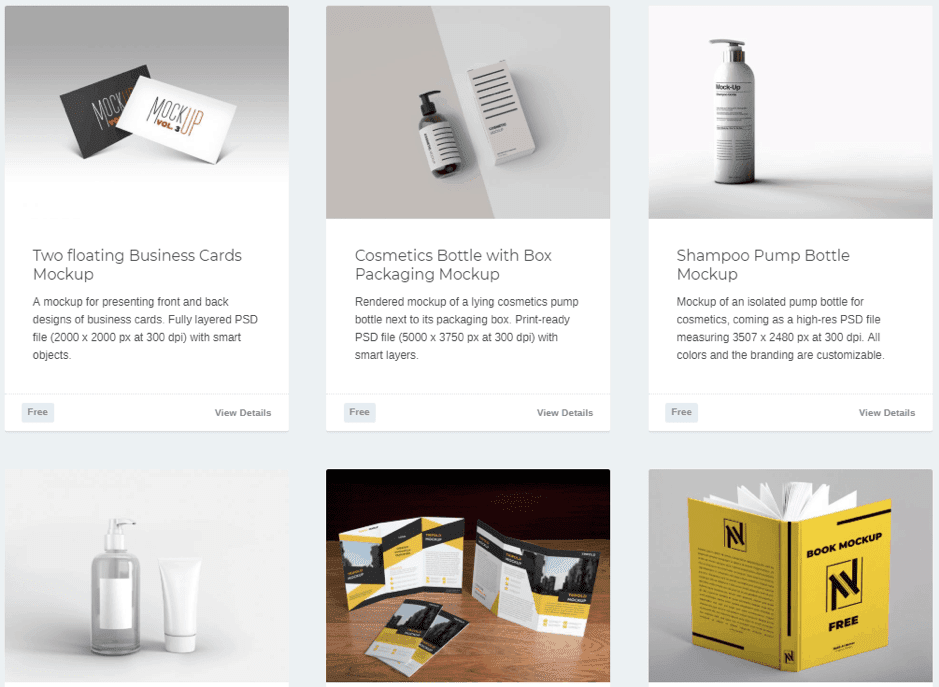
Mockups are a great way to present your header in a visually pleasing way, while at the same time giving a visual nod to your blog’s niche. For example, a tech blog could feature a mockup of a computer screen with the blog title on it. Or a fashion blog could include a handbag with the header across it.
Using mockups gives your blog a professional feel, with high quality graphics but at a low cost. There are plenty of sites such as Mockup World or Dunnnk that provide free mockups for you to use on your site. Find an image that best captures your blog niche to keep it consistent with your brand.
Keep your images relevant
The first taste is with the eyes, or so the idiom goes. If you saw a chocolate cake that looked delicious, but when you ate it it tasted like a cheeseburger, you’d be more than a little confused! And the same principle applies to your featured image too.
The human brain processes visual content up to 60,000 times faster than copy. That means that when your readers see your blog post, they’re subconsciously looking at your featured image before your actual title. If your header image doesn’t match up with your content, then it will seem jarring to your readers, and they might even bounce away from your blog.
To avoid this, always find images that link up to your blog title or topic. It doesn’t need to be overt — even if the image is only slightly relevant, it’ll be enough to give your audience a seamless link to your blog.
Get access to “Checklist: Pro Tips For Best Blog Images” by joining our Free Resource Library, just CLICK BELOW!
Avoid negative imagery
Following on from the above, not only should your featured image be relevant, but you might wish to consider your use of negative imagery as well. Many brands and bloggers stipulate in their editorial guidelines that negative images, such as someone pulling their hair out or looking stressed, should be avoided at all costs.
Their reasoning for this is that such imagery evokes similar emotions in their readers. Instead, the use of positive images elicits corresponding emotions, giving the reader a pleasant association with their brand. For example, a post titled “21 Mistakes Every Marketer Makes” could include a photo of a stressed office worker, but instead features one that shows a happy individual. Small changes like this can have a significant effect.
Ditch cliché generic stock photos
We’ve all seen them. From smiling men and women in suits with their thumbs up to the woman laughing alone with salad, clichéd stock photos are everywhere on the internet. With so many generic stock photo sites around, you can find them all over the place, from blogs to business websites.
Luckily, there are plenty of websites offering free photos that aren’t full of forgettable stock clichés. Many of them crowdsource their imagery from the general public, with freelance photographers contributing their own work in return for a credit. So if you do use a free stock photo, always be sure to credit the photographer below!
Choosing the right featured image is part of effective blog promotion. Here are 19 other ways to promote your blog posts and optimize your reach!
Take your own photos
In the same vein, why not ditch stock photos altogether and take your own photos? Many of the latest models of smartphones on the market come with sophisticated cameras. As well as high-quality lens technology, they also offer a range of filters and modes, such as portrait, panoramas, lighting effects, and more.
There are lots of free resources online that can help you become a better photographer. Once you’ve perfected it, you’ve got a virtually limitless supply of 100% original content. Use some free photo-editing tools to edit and enhance your photos to make them perfect for your featured image.
Your blog’s featured image might not be as important as your writing itself, but it still plays a key role in persuading your readers to click through to your post. It can also help you build brand awareness across your channels by giving your blog a more professional feel. Keep your featured images clean, consistent, and always of the highest quality. It’s a small aspect of your blog, but one well worth getting right.
Need more tips in selecting images for your blog content? Click here!
Article Written By:
Kayleigh Alexandra is a content writer for Micro Startups — a site dedicated to giving through growth hacking. Visit the blog for your latest dose of startup, entrepreneur, and charity insights from top experts around the globe. Follow us on Twitter @getmicrostarted.
ANY BLOG FEATURED IMAGE TIPS YOU WANT TO SHARE? LEAVE A COMMENT AND LET’S CONNECT! I WOULD LOVE TO HEAR FROM YOU!
